the honey

As moving to the country we have a vision of in the future being self subsistence. It´s is a vision and we the don´t think that we will fully get there. We will have chickens for egg within short.

Anyway, I was just surfing the internet and found a used beehive. I bought it without thinking very much about it and got my Mr to pick it up. I thought I would just have to get bees and then collect the honey. My Mr thought I should take a class in how to be a beekeeper. So I did. It turned out to be so much more work and I would have to aquire lots of knowledge, and that made me hesitate. Would I be able to take care of bees and have them survive the winter?

We will just have to wait and see.

I got the bees from my mentor. His name is Olle and he is just a fantastic and generous man who gladly shares his knowledge. He is also very helpfull and came to our house to get the bees settled in.

May has been just beautiful. We´ve hardly had a drop of rain and the bees have been working really hard to get their storage full. In only 3 weeks it was time to extract the first honey.

I´ve decided to name the honey; hjälmarödshonung, since Hjälmaröd is the name of the plcace where we live.


another wall

Sometimes it feels like all I´m doing is making good work places. I hardly ever do any art work.

The ceramic studio is on a break. Now I do the sewing and silver smithing studio.

This is what the studio looked like when we just moved in. As you can se there´s no rail or anything to protect you from falling down the stairs. Kind of scary. Also I had to put my big workbench somewhere, and after trying to put it under the angled celing I realised I was not going to be able to stand straight to work. So I got an idea. Lets make a wall next to the stairs, that way no one will fall down, and I will have a good spot for the workbench.

Back to the lumberyard for more lumber and plaster boards. I did call my dad so he could come and help me getting started.

This is how far we got when my dad helped me. Now I´m on my own again.

More studs.

Plaster boards.

Other side, insulation and more plaster boards. Doing the small ones again.

Done.

Painted once. And i also put oil stain on the big stud to make i match the lumber in the ceiling.

Admiring my work from the pull out sofa I thought it might be nice with some wallpaper. I´ve had my eyes on one for a while now, wich I would like to put in all the hallways in the house. That´s an upcoming project, and I would really like to see that beautiful wallpaper on a wall now. I placed an order, and two days later the wallpaper arrived and I got it up there the same day after work.Of course, there are ferns.

All done!

The work bench has found a good place, and hopefully no one will fall down the stairs.


a wall is rising

Making a wall is not really hard. It just takes time, planning and patience. I don´t really possess a lot of planning skills or patience, and at the moment, not a lot of time either. There´s so much to be done to the house we moved to. So whenever I work in the ceramic studio I steal time from the house. That makes me kind of stressed out.

But some work has been done!

I did a stupid thing, wich often happens because of my disability to make plans. I had one small jar of this beautiful pink paint, and I used it on the side of the sliding door that´s gonna be hidden behind the wall and never being seen by anybody. If I used it on the left side of the door it would have been just enough.

What to to with the ugly pipes?

Since I did all the work by myself, I didn´t have a chance to put plaster boards on the back of the wall before rising it, therefor I put chicken wire in the back of each square to keep the insulation in place.


Next step, plastic.


Insulation and plaster boards. I had to go with the 60X120 cm, because the big once are to heavy, when working alone.


All covered.


Wall filling in place!


Since I´m going to try to put tiles on the wall above the sink, I only painted the top of the wall. Don´t wanna waste paint right??? And now I had to go with white on the sliding door, since I´m out of pink.

I was very lucky. We went to my mother in laws old house to collect firewood. I found left over tiles from when she did renovation in her bathroom. Of course I could have them. When we got back home I counted and meassured, I would be able to cover half the wall above the sink, with three tiles left!!!


I made a frame for the sink. I got a helping hand from my mother in law to get the sink up there.


Look!!! I did it, all the tiles are up on the wall. And they´re straight too.

Next step, tab and plumbing. I also need to build a sludge separator.

moving to the country, gonna eat a lot of peaches…..

Welcome back! I know that it has been a while since I last wrote something here. The last few years have been rough, and I will probably write all about that later.

Also, the number of English speaking friends has increased, therefore I will do my best to make this blog readable in English.

Four or five years ago somebody asked me what I wanted to do five years from now. I said I had a vision of myself living in a big house in the country and doing pottery. I didn´t even do pottery back then and living in the country seemed like an unreachable dream.

I know, I know… It´s a cliche. It´s kind of every other middle age womans dream to move to the country and do pottery. But I don´t care. The dream is about to come true.

Here I am. A big house, with a gorgeous view and a stable ready to be turned in to a pottery studio.

The main building. The lake is behind me.


The stable building. The white part will be the pottery studio, and hopefully there will be room for a small boutique too.

A lot of work is needed. This space was used as a flower room. The woman who used to live here has a passion for gardening. Useful things that are allready here is a working water heater, flouroscents in the ceiling in the main room, and lots of shelfs.

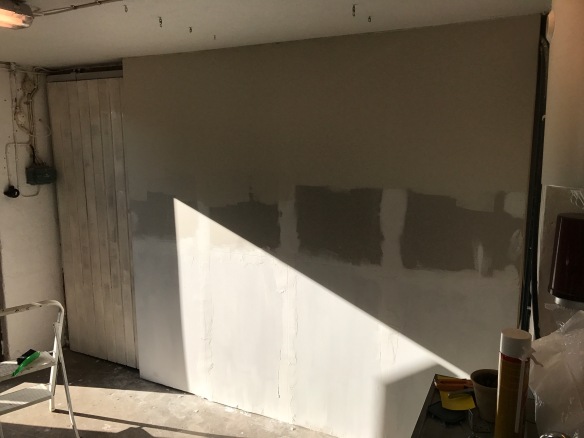
This is what the pottery studio looked like when we just moved in. I have managed to take down the big shelfs in front of the sliding door. That´s the best spot to place the sink. The drain is right there in the middle. So it should be fairly easy. It´s just that you can´t really put a sink on a slidig door. You need a wall for that.

Said and almost done. This is how far I got yesterday, before and after a meeting with my sons new school, and going to the store for plasterboards, insulation and studs.

Beginning of a wall in front of the sliding door. I have to be able to open the door since the kiln is right behind it.

Remember the kiln project? https://klemkeckaemma.wordpress.com/2015/10/04/en-ny-kategori/

Nothing happened with that. The kiln was still in the garage when it was time to move. I did however buy a smaller kiln that I had installed in the basement. But now it´s time to get the big one going. Just need a visit from the electrician, who has promised to come soon and have a look.

To be continued…..

mammas kudde

Det här är något jag fick idén till när jag höll på med min systers stjärnkudde. Mamma skulle snart fylla år och hon hade bytt ut sitt vardagsrumsmöblemang med nya soffor, matbord, stolar och skänk. Matrumsmöblerna går i 50-talsstil. Hennes soffor är grå och hon har några vinröda kuddar. Grått och rött och trianglar fick det bli.

Jag kryssade först på ett rutat papper för att får rätt form på trianglarna. Först testade jag att bara öka med ett steg på höjden, men det blev inte riktigt formen jag tänkt mig, så jag dubblade till två rutor. Jag var nöjd och satte igång.

Jag valde ett grått linne tyg till baksidan. Detta var den första kudden jag monterade och det tog tid innan jag fattade exakt hur jag skulle göra för att dölja dragkedjan på ett snyggt sätt.

Färdig. Jag tror att mamma blev glad.

årets första julklapp klar

I somras, efter att jag hade gjort ett par broderier, och kommit igång bra med egna geometriska mönster, frågade jag min faster om hon ville ha en korsstygnskudde, och i vilket färg i så fall. Hon svarade först att hon inte ville ha någon, men sen kom det fram att hon gärna ville något med pingviner. Attans, tänkte jag, jag vill ju göra enkla, geometriska mönster i klara färger. Men jag hade ju sagt det. Så in på pinterest och leta mönster med pingviner. Det var detta jag fann.

Det var inte kvadratiskt, så jag fick lägga till lite på sidorna. Kudden blev också ganska liten, så för att få den 40 x 40 la jag på två ramar, i samma färger som finns med i pingvinerna.

Baksidan är gjord av linne/viskos i nästan samma färg som den innersta ramen. Efter lite träning och slitet hår, börjar jag bli riktigt bra på att sy fast en dragkedja bakom ett veck, så att den inte syns alls.

img_9710

Så här blev den när den blev klar. Nu ska den bara läggas i en kartong, och slås in i julpapper. Faster ska få den i julklapp. (Jag tror inte att hon läser här.)

img_9708

korsstygn

Nu, eller rättare sagt i mars, blev jag helt såld på korsstygn. Det började med att jag behövde något att göra när jag väntade på att keramiken skulle torka lite och jag kunde flytta mina alster från drejskivan. Sen blev källaren full av torkad keramik, eftersom jag fortfarande inte har lyckats koppla in min brännugn. Med det fick jag ta en paus i drejandet och sen dess har det varit korsstygn för hela slanten.

Detta är ett eget mönster och jag började med den som en födelsdagspresent till min syster. Det har blivit ännu ett par kuddar. Jag kommer att lägga ut dem här, men de finns också att beskåda på mitt instagramkonto för hantverk; colormehappy.se